|
|
|
|
Sockey Fishing Sockeye can be the most difficult of the Pacific salmon to catch effectively.
Most are incidental catches when fishing for other species. However, if properly targeted they can prove to be one of the
best fighters, pound for pound, of any of the salmon. The trick is to copy the commercial method of fishing. I like to run
as much gear as I can, at least four rods with flashers and Googly Eyed Wild Things. I run two rods per downrigger, a full size O'ki (the Big Shooter) on the bottom on a heavy trolling rod and 20-25 feet above
it a L'il Shooter on a mooching rod. This keeps the drag down on the downrigger wire, and the mooching rods are great fun
with a 10-12 pound sockeye on. I keep the two downrigger depths 10 feet apart and with the distance the same between the upper
and lower rods on both sides, this covers every 10 feet from about 60 up to 30 feet it also keeps the gear from tangling on
turns). All this gear sparks a feeding frenzy and the sockeye will follow your gear and keep hitting. Once you get
a hit remember the direction of troll and keep going in that direction (either with or against the current depending on the
strength of the tide). Once you stop getting hits pull all your gear and motor back to the start position and troll the same
pattern again. We have found at times that when you troll back into the tide and increase your speed you hit coho on the return
run. Our boat trolls fairly fast and we found that a 44 inch leader works well on the Big Shooter and a 36 inch leader on the L'il Shooter. This is easy to remember as it is exactly four flasher lengths in both cases. Reduce this to 3 flasher lengths for a slower trol. As far as lures go we generally use the red Googly Eyed Wild Thing if the water is fairly clear. If the plankton is blooming you can go to the G.E. Yellow Sissy W.T. Use the G.E. Deep Diver W.T. both early in the morning or when fishing very deep. We have found productive depths to be from 30-60 feet but have hit them down to over 100 feet. We have hit a lot of Springs (king Salmon) using this method as the longer leaders slow down the movement somewhat. In the 1999 year our biggest Spring was taken on a G.E. Yellow Sissy W.T on the shallow rod while fishing for sockeye. We often stagger the yellow and red Googly Eyes, one of each at each depth.
|
||
|
Halibut Fishing Methods Here in Port Hardy we fish a couple of ways, one
with a hand line and two with a halibut rod. Our fishing grounds are very deep compared to other areas of the Coast. Most
of the time we are over 300 feet and it is not uncommon to go over 400 feet. Compared to areas near Victoria, BC where you
can find good fish between a 100 and 150 feet, these depths have caused special methods to be adopted. All fishing is done while drifting. There is no way to anchor in such deep water and so we are at the mercy of the tides. We therefore have to pick our areas carefully and on some days, just not bother. For those who use hand lines the only lure is the jig. Three hundred pound test lines are used (it is easier on the hands) and a variety of spools have been designed to hold the unused line. One major problem is stepping in a coil of loose line on the deck while pulling in your catch. The lures used are lead jigs with skirts of various colors (see the article on making jigs). We prefer a large (10/0 or bigger) single hook rather than the more common large treble, for two reasons. One; it is much less likely to get hung up on the bottom and two; we find that it may be slightly harder to hook the fish, but once hooked they seldom throw the single hook. The other method of fishing, and the one most used by local charter boats, is the halibut rod and reel. Several companies make specialty halibut rods, the ones about five feet are the best. For a reel the larger Penn Senators with high retrieve are popular. Several of us also use small marlin reels. To reduce drag we use one of the new high tech lines. Our favorite here is 130 pound test T.U.F. Line™ made by Western Filaments. The 130 pound test is the same diameter as 80 pound dacron, and to save our reels we use 100 yards of dacron backing sewn into the T.U.F. Line. This thinner line allows us to get down to the depths needed in this area. For lures used with the fishing rod method of fishing we can either use the same jigs as with the hand lines and use the rod to jig the lure, or use a spreader bar set-up. The main thing to remember if you jig a lure with a rod is not to lift the rod too high. Lower the rod tip to the water and lift to level with your waist. This still moves the lure 3-4 feet and gives it action, but allows enough room to hit a fish if it bites on the upward movement. With the spreader bar ( see picture in the section on making jigs), lower it to the bottom and then reel up a turn to keep it close, but not dragging, on the bottom. If you are drifting down hill (the water is getting deeper) keep checking that you are close to the bottom. We often leave the rod in a holder while doing this and then have coffee while watching the rod tip for a nibble. When you get a nibble feed it a few feet of line and pick up the rod and wait for the fish to take the bait. Hit the fish if you feel that he has taken the bait. This takes some practice to get the right feel and often you don't hook the fish the first time. If not, feed out a foot or two of line and try again. You may have to bring up your line and check your bait. Using spreader bars means the use of some type of bait. The three that we use are octopus, herring, and squid. We find that the use of octopus can be the most cost effective, even though the price is much higher in most areas. This is due to its toughness. It takes a lot for a fish to bite through or tear off a hook, and it lasts for hours. Herring and squid on the other hand can be pulled of easier and sometimes when you hit and miss a fish the drag will pull off your bait. This is why you must check your rig-up often. The upside to herring, and to a certain extent squid, is that the strong smell travels for quite a distance and is a very effective bait for halibut and yellow eyed rockfish (red snapper). Most often we use a mix of baits to find out what is working that day, and then load up on that bait. It seems its never the same two days in a row. One thing to remember with the drift method, if you are moving at a good clip (half of a knot) you will cover a lot of ground and be able to keep your gear on the bottom. However, if the drift is too slow, or you are anchored move often if you are not getting hits. If anything is going to hit your lure you will know within 10 - 15 minutes or so. Once you hit fish mark it on your GPS or take some bearings so you can return to the same spot. This is especially important if you are drifting. Motor up to just past the site and drift over it time and again. Good fishing! |
|
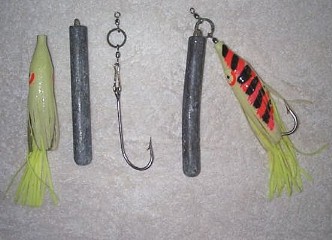
Making Halibut Jigs Your average jig can be broken down
into a few basic parts, a hook (or hooks), an attractor (skirt or hootchie) and a weight (see picture). On the left you see the three major components separated and on the right assembled. I prefer to use the long shank
O'Shaunessy 9/0 hook with a large Berkley snap, attached to a brass split ring (75 pound breaking strength) with a 1/0 or
larger swivel. I use this method for the ease of changing hooks. As well the whole jig only takes a few minutes to assemble. You can
also change the skirt in less than a minute. You can vary the hook set up to a tandem rig using trolling wire and brass crimps,
just remember to slip on a swivel before crimping the top hook. We prefer the pencil weights in this area because they don't snag as often. Quite serviceable weights can be made by filling lengths of chrome chair legs with lead (remember to insert a piece of brass wire at the top before pouring). It's a good idea to check with the old lady before turning her kitchen set into jigs. A foot long chrome weight made from the thin part of the leg will weigh about a pound and be long enough to keep the hook well away from the bottom. This will allow you to thump the bottom with the weight. The halibut can feel this for quite a distance and come running. The hook of choice is any large single hook. Time after time we have found that once hooked fish find it quite hard to throw the hook. Treble hooks may hook a few more fish but are easier to throw and much easier to snag on the bottom. 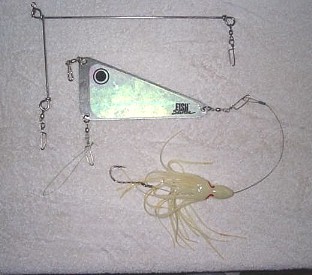 Two types of spreader bar are shown on the left. The standard stainless on top and the Fish Stalker made locally on Vancouver Island. The top snap is attached to the fishing line and a pencil or ball weight is attached to the bottom snap. When attached this way the lure is forced away from the line so it won't foul hook. I use a tandem hook setup for herring in which case the hootchie is not necessary. |
|
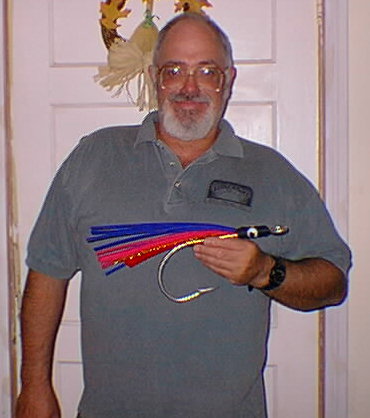
DJ in the flesh holding the Zipper Fly the locals use to catch Killer Whales (just kidding of course, I love Killer Whales, we have the same body fat percentage).
|
|
Dressing Up Your Lures Ok, you're all set up with your Googly Eyed Wild Thing and your best flashers and nothing seems to be happening. First thing I do is check all the boats around me for action. Remember all the salmon but springs move around in fairly large schools (springs travel in groups as well but much more spread out). If other boats seem to be doing well move closer or mimic their actions. You can always ask what depth they are working, I usually tell people, but not all fisherman are willing. So now you've got the area, the depth and the speed, but still nothing. Well now there are a couple of things to do. You can try changing the leader length. The shorter you go the more action on the lure. Change one lure at a time and give it a chance to work. One other trick we use is to take your Googly Eye and cut off the swivel, take the lure off the line and add one or two 8 mm. beads of a contrasting color next to the hook and then re-string the Googly Eye. This will give it a little more action and add to the colors available. It also puts the hook behind the lure a bit and often will catch the unwary coho. They at times seem to hit the tail end of the lures without getting hooked. With the hook trailing a bit it is already in their mouth when they nip the lure. We will do the same thing to our hootchies if they aren't producing, or you don't seem to have the color of the day, we will take a leader and string on several fluorescent beads and slip the hootchie over the beads. The first bead is necessary to fill out the head of the hootchie and is used with two hook setups as well. The rest of beads will add color both through the material of the hootchie in some cases, or at least between the strands of the lure. Always put enough spacers in so that the hook is 1/2 inch in from the end of the skirt. Bead are a cheap and effective way to add color and variety to your lures. We sell several colors in 8 mm, the best size for hootchies. The red and chartreuse beads are fluorescent, there is a glow bead (phosphorescent). The green bead is useful to add color and the clear are best for spacers, or head inserts where you don't want to affect the existing color. We are also offering a start up kit for Googly Eyes which contains one each of all seven Googly Eyes, seven beads in each of the 5 colors and a bag of 7 swivels. See the specials section for prices. |
|
|